Over the years I’ve come to appreciate the benefits of wrapping the outside of a wood-frame wall with a layer or two of foam insulation - the most obvious of which is the effect it has on thermal bridging. In a typical wood-frame wall, one with no exterior insulated sheathing, thermal bridging through the studs and plates accounts for a 20%+ decrease in the nominal thermal resistance rating of the wall (i.e. R-20 is actually R-16 or less).
 There are other important benefits too, such as ease of air-tightening the structure and reducing the potential for exterior moisture making it further into the wall. We’ve made insulated sheathing a feature of our panelized walls for many years, in part because it's a “universal” approach that works just as well in hot humid climates as it does in cold dry ones, something that fits neatly with our commercial strategy for conquering the world. In a place like southern Japan where it gets unbearably hot and humid in the summer, a closed-cell insulated sheathing like polyisocyanurate (call it poly-iso), not only helps to keep the heat out, it acts as a vapour barrier, preventing exterior moisture from making its way in and condensing somewhere in the wall - say on the back of the drywall that has been cooled by air conditioning.


In a cold climate like we have in Ottawa the vapour drive for most of the year is in the other direction, from inside where we are cooking, doing dishes and bathing the dog, to the outside. So in our climate we are required by code to install a “vapour diffusion retarder” (aka vapour barrier...) on the warm side of the insulated wall (or ceiling, or floor) to prevent moisture from condensing somewhere in the wall - say on the back of the OSB sheathing that has been cooled by the winter winds.
In cold climates most builders install a layer of polyethylene sheeting (call it poly) immediately before installing the drywall to do this job of controlling vapour diffusion. Where this can get confusing is that most northern builders also rely on this poly as an “air barrier”, going out of their way to seal around electrical boxes, laps in the poly, plumbing stacks and any other place where unwanted air can leak through the membrane.
I’ll get back to why air-leakage is so bad in a moment but in the mean time it is useful to know that there are other ways - more simple ways in fact - to control air-leakage than by sealing up a poly vapour barrier. The downside of sealing the vapour barrier on a wall in a cold climate where you’ve installed exterior insulated sheathing is that you create a kind of moisture trap, where any moisture that does find its way in - like on a rainy day during construction - has a difficult time drying out and can contribute to mould growth. The key is to maintain what is called “drying potential” which is exactly what it sounds like, the potential for the wall to dry out if it does happen to get wet. Given that our local codes require a vapour barrier, and yet we want desperately to use vapour-proof exterior insulated sheathing, our approach has been to turn the polyiso into the air barrier and allow a wet wall to dry slowly to the interior by simply not sealing the joints and penetrations in the poly barrier... make sense?
If you’ve stayed awake during this explanation you may be wondering about the vapour diffusion that occurs through the unsealed laps and holes in the poly. It turns out that the amount of moisture that moves into the assembly this way is so insignificant as to be completely inconsequential. The key to all of this lies in doing a great job of the air barrier, and we have developed a set of details and techniques for turning our foam sheathing into a continuous air-tight membrane.
Now back to why air-leakage is bad. The single biggest contributor to energy consumption in an average building is the leakage of untempered air - hot in the summer, cold in the winter - from outdoors because of the work the mechanical system has to do to bring it to the temperature and humidity level deemed comfortable by the occupants. As air leaks through the building fabric it carries with it moisture that can condense on surfaces within that are below the dewpoint temperature. In fact, when compared to vapour diffusion as a mechanism for pumping moisture into the fabric of the building, air leakage turns out to be a much more significant culprit - dramatically more significant (see diagram below). Air leakage also brings with it outdoor noise, dust, and airborne pollutants - pollen for example - that can compromise the health and comfort of the occupants.

While that sort of makes sense, most people intuitively feel that sealing up a house will be bad for their health, that they will be “stewing in their own juice” as it were, which would be true if it not were for the other side of the healthy house coin - mechanical ventilation. When air leakage is controlled and a properly sized mechanical ventilation system is installed the occupants are suddenly in charge of their domestic lives like never before. If the humidity level in the house gets too high, the ventilator can automatically lower it. If it’s pollen season and the kids are wheezin (sorry), the windows can be closed and the pollen filtered out of the ventilation air with a low-cost washable filter. If fear of burglars, the noise of a nearby road, or plus/minus 30 deg. C temperatures conspire to keep the windows closed, the ventilator can magically lower CO2 levels and eliminate the memories of last nights fish dinner. Like in so many things, it’s all about control. People who live in airtight, mechanically ventilated houses have it, those who don’t, don’t.
While I’m at it, the main criticism leveled at the “airtight / ventilate right” strategy described above - beyond paying for the ventilator in the first place - is the cost of operating it. While there are several ways to mechanically ventilate a house, we are big fans (sorry again) of “Heat Recovery Ventilators” (HRV’s), machines that bring fresh air in from outside, exhaust stale indoor air, all the while transferring thermal energy from one airstream to the other using a simple heat exchanger. In the winter an HRV takes incoming fresh cold air and pre-heats it with the outgoing stale warm air without mixing the two air-streams. In the summer the outgoing stale air not only cools the incoming fresh air, it also dehumidifies it, further reducing the need for air conditioning. HRV’s typically recover 50-70% of the outgoing thermal energy, which may seem low-ish but far better than cracking open a window and switching on a bathroom fan when it’s minus 20. Many HRV’s now come with EC motors (Electronically Commutated) which draw very little power - usually in the 40-70Watt range (think of a light bulb) in low-speed operation depending on size and make. For those who feel that buildings should be “passively” ventilated, somehow breathing on their own without the aid of expensive energy consuming equipment, don’t bother, it doesn’t work.
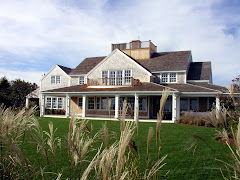
Sorry for the tangents, but all of these things are related... You now know that the wall panels we built for the Snye House were clad with insulated sheathing but how much polyiso is enough was the subject of some debate during the design charrette (see earlier blog posting) we held back in March.
Before we convened for the charrette we put the house through two types of computerized heat-loss simulations - two types so that we could compare the results for consistency. Tools like this allow building designers to test the energy implications of a wide range of factors, including insulation levels, window size and placement, roof overhang shading, air leakage values and a host of other things. Using the software we looked at the energy benefit of adding more insulated sheathing relative to its cost, which sounds rational and scientific and does produce some useful insights. One of these is that adding more and more insulation follows the “law of diminishing returns” maxim, where the first bit gives you the greatest benefit and beyond a point it is hard to rationalize the economic sense of adding more. That’s fine, but there are two variables in this equation that can dramatically alter the result: 1 - predictions about the future cost of energy, and 2 - the inclinations of a guy in the energy efficient housing business who wants bragging rights about how well insulated his house is and given that I’m only going to insulate this building once, how much insulation is going to make me feel like I’ve done enough.
 It’s worth mentioning at this point that there is a basic truth behind much of the thinking that went into the design of the Snye House. In the world today conserving energy turns out to be cheaper in the long run, more reliable, and less harmful to the environment than buying it or even using bolt-on technologies like wind-power or pholtovotaics to generate it. While such “renewables” are clearly useful in reducing dependence on fossil fuels they make little sense on drafty, poorly insulated buildings. The oft-used illustration of this truth is the leaky bucket analogy... If you have a leaky bucket, you have two ways of keeping it full of water - go get more water or plug the holes in the bucket.
At first I looked at building a 2x4 wall at 16” centres with rockwool batt insulation in the stud cavity and 3” of polyiso on the exterior for a nominal R-value of 36 (U=0.16). Before long I’d graduated to a 2x6 wall at 24” centres with Icynene (www.icynene.com) stud cavity insulation and 4” of exterior polyiso (www.atlasroofing.com) for a nominal R-value of 50 (U=0.11), which is where I stuck. (Note: these thermal values include the radiant barrier effect of the foil-faced polyiso sheathing). My chums at the charrette pointed out that at todays energy prices this uber-wall made little economic sense but were all agreed that with these prices trending wildly upwards there was an argument for buying as much insulation as I could afford.

Footnote: Those in the know about insulation might be wondering why I would use Icynene - a 1/2 lb. density foam - instead of a higher performance 2 lb. foam in the stud cavity. The answer is that 2 lb foam is more expensive and I was bumping up against the limit of what I could reasonably afford. I wanted to use some type of spray foam because it does a more reliable job of filling the stud cavity than site installed batts while simultaneously adding to the air-tightness of the structure. Also, the chemical constituents of Icynene - like those of the polyiso we use - have no ozone depletion potential and contribute no discernible chemical burden to the indoor air, not the case for many 2lb foams.
Before moving on I’d just like to mention one other important feature of the Snye wall panels - the rain-screen. Regardless of what you clad your building with - brick, rendered block, cedar shingles, clapboard siding, cement board with stucco, anything at all - the rain's gonna get through. When it does, you’d better have a way for that water to drain back to the outside before it gets any further into the structure and does some real damage. The accepted best practice in this regard is to treat the exterior finish as a “rain screen” by providing a cavity behind the cladding, flashed in such a way as to lead any wind-driven rain back outside. In our case, with a plan to use horizontal wood siding as an exterior finish, we installed 1x3 vertical wood battens on the surface of the polyiso as a nail base, fastened back through the foam to the studs with 7” screws. The battens create a 3/4” gap between the back of the siding and the surface of the rigid foam, an air-space that becomes pressurized in a driving rain, preventing moisture from jumping the gap. Any water that gets through runs down the back of the siding and out at the bottom. The air space also promotes balanced drying of the siding after a storm. When wood siding is nailed tight to another surface rather than on battens the front surface dries and shrinks more quickly in the sun than the back, causing the material to cup.

 The panels were built in our Carp shop in June. As this was my house and not that of a valued Client the June time slot had more to do with a gap in our shop schedule than it did with being ready for the panels on site. In another “low man on the totem pole” decision we used borate-treated framing material, not from any concern about moisture affecting the wood, rather we had some left over from a UK job where they are (overly) worried about moisture affecting wall framing and where treated material is thus a de facto requirement. The borate treating colours the wood and for some reason the batch we had on hand varied from green to lavender. With no UK jobs on the horizon we felt it better to use it up rather than get into a complicated discussion with a Client about why we use multicolored wood.
Before erecting the panels on site we were anxious to sheathe the top of the timber frame with 2x6 Douglas Fir decking and cover it with a waterproof membrane. The DF decking, which acts as structural sheathing and the ceiling finish for the living and dining rooms, was pre-stained on the exposed face with a single coat of white stain to give more visual prominence to the timbers. On top of the decking we installed a layer of Ice and Water Shield (www.grace.com) to protect the decking and timbers from the rain and to serve as a vapour barrier in the final insulated roof assembly.

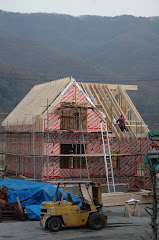
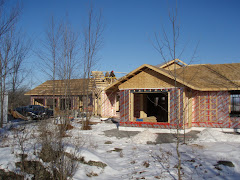
Some of the wall panels went up before we’d finished sheathing the timber frame because of a special arrangement we had with our crane operator. Bill Gardiner of Gardiner Tree Removal is one of the most experienced and skillful crane operators around and our preferred choice for any work we do in the area. It also happens that his shop is about fifteen minutes from our site so we worked out a deal where Bill would drop around at the beginning or end of his day for an hour or so to help move us along without charging the four hour minimum that is typical in the crane business. We brought our wall panels to site a bit ahead of schedule to take advantage of this arrangement and managed to get a few of the ground floor panels installed one morning even though we hadn’t finished sheathing the timber frame.


Erecting panels is always an exhilarating process. The building takes shape very quickly, the spaces and views imagined at the design stage emerging into the real world with every panel that is set. With the ground floor exterior walls up in less than a day Jesse and George took the next two days to install and sheathe the pre-cut second floor framing. Another part day of second floor exterior walls and we were suddenly ready for trusses, very exciting for all of us, but especially for the carpenters who had labored for so long in the trenches.